Running Iceberg and Serverless DuckDB in AWS

Iceberg and DuckDB on AWS
In our last post, we showed how to query Iceberg tables with DuckDB in a cloud setting using Google Cloud Compute resources. In this post we will do the same but with AWS resources, specifically:
- RDS (Postgres) for the Iceberg catalog
- S3 for file storage
- ECS (Fargate) for compute
Lastly, we will also show some of the networking set up needed to allow all of the pieces mentioned above to interact with each other.
This post will mainly cover the steps on how to run Iceberg and DuckDB in AWS; if you would like to learn more about what Iceberg and DuckDB are, how they work, and how they might be used in tandem please refer to some of our previous posts:
- How We Migrated Our Data Warehouse from Snowflake to DuckDB
- Why Databricks paid $1B for a 40 person startup (Tabular)
- Comparing Iceberg Query Engines
- Running Iceberg and Serverless DuckDB in Google Cloud
Postgres on AWS RDS
Before setting up Postgres, we will create a new security group that will allow inbound traffic from either any IP address or specific IP addresses to our Postgres instance. To do this:
- In the AWS console go to VPC → Security Groups
- Click Create Security Group. Give your new group a name (we named ours
iceberg-catalog-demo-security-group) and under Inbound Rules add a rule that allows all traffic (Anywhere IPv4) for type PostgresSQL and click Create: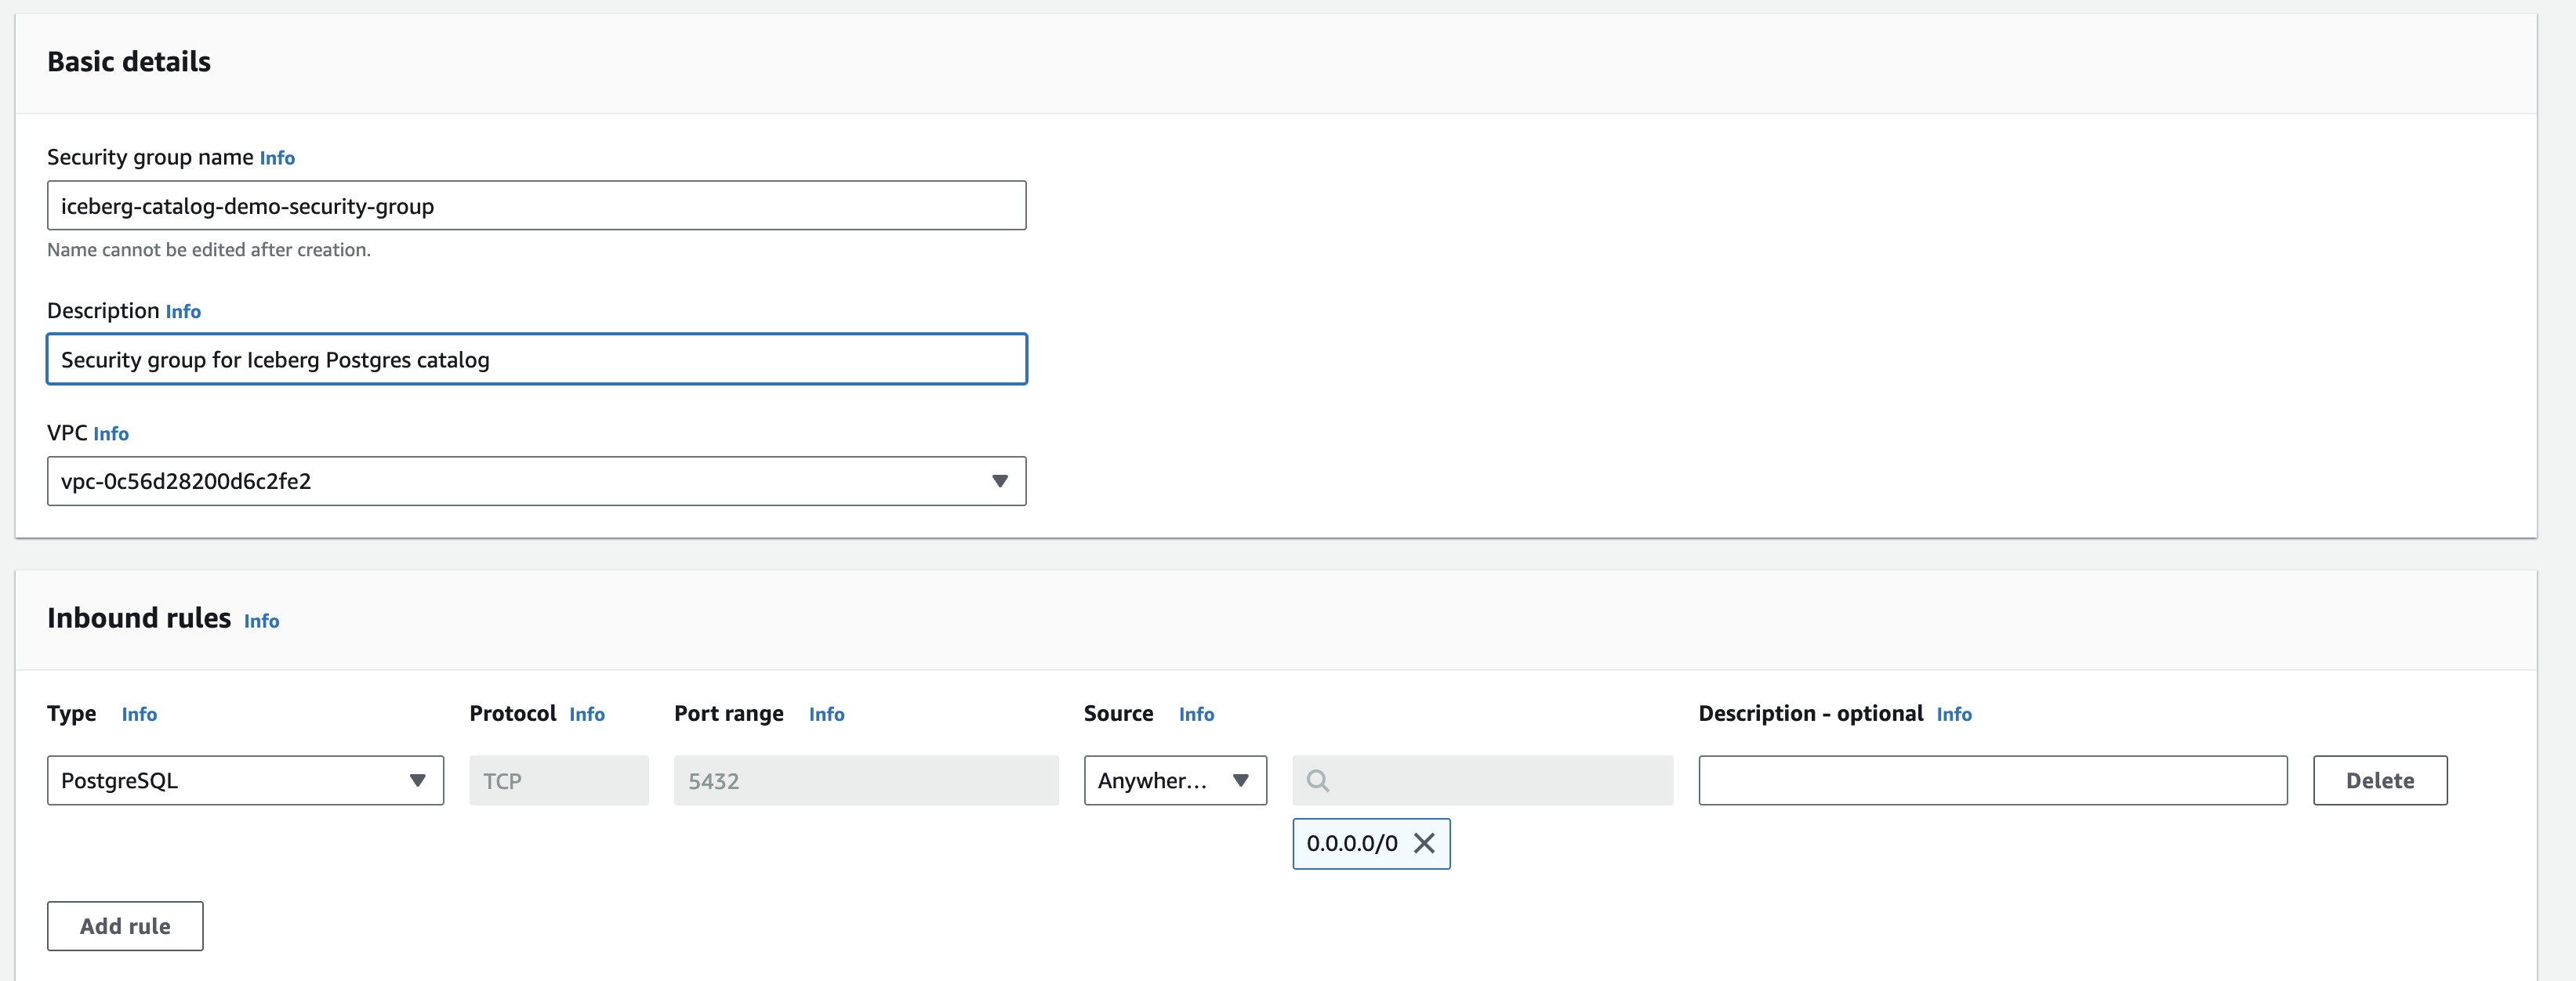
Now that we have our Postgres security group set up we can provision a new Postgres instance in RDS:
- In the AWS console, go to RDS → Create Database
- Select PostgreSQL for the engine type and any other configurations. Give it a name (eg
iceberg-postgres-catalog-demo). Default settings work or to save costs you can choose the Free Tier template and a Single DB Instance. - For the database password you an either elect to come up with your own or have AWS manage and create one for you. If you choose the latter, the password can be found in Secrets Manager after database creation.
- Under the
Connectivitysection, select “Yes” for public access and under “Existing VPC security groups” select the VPC group we just created: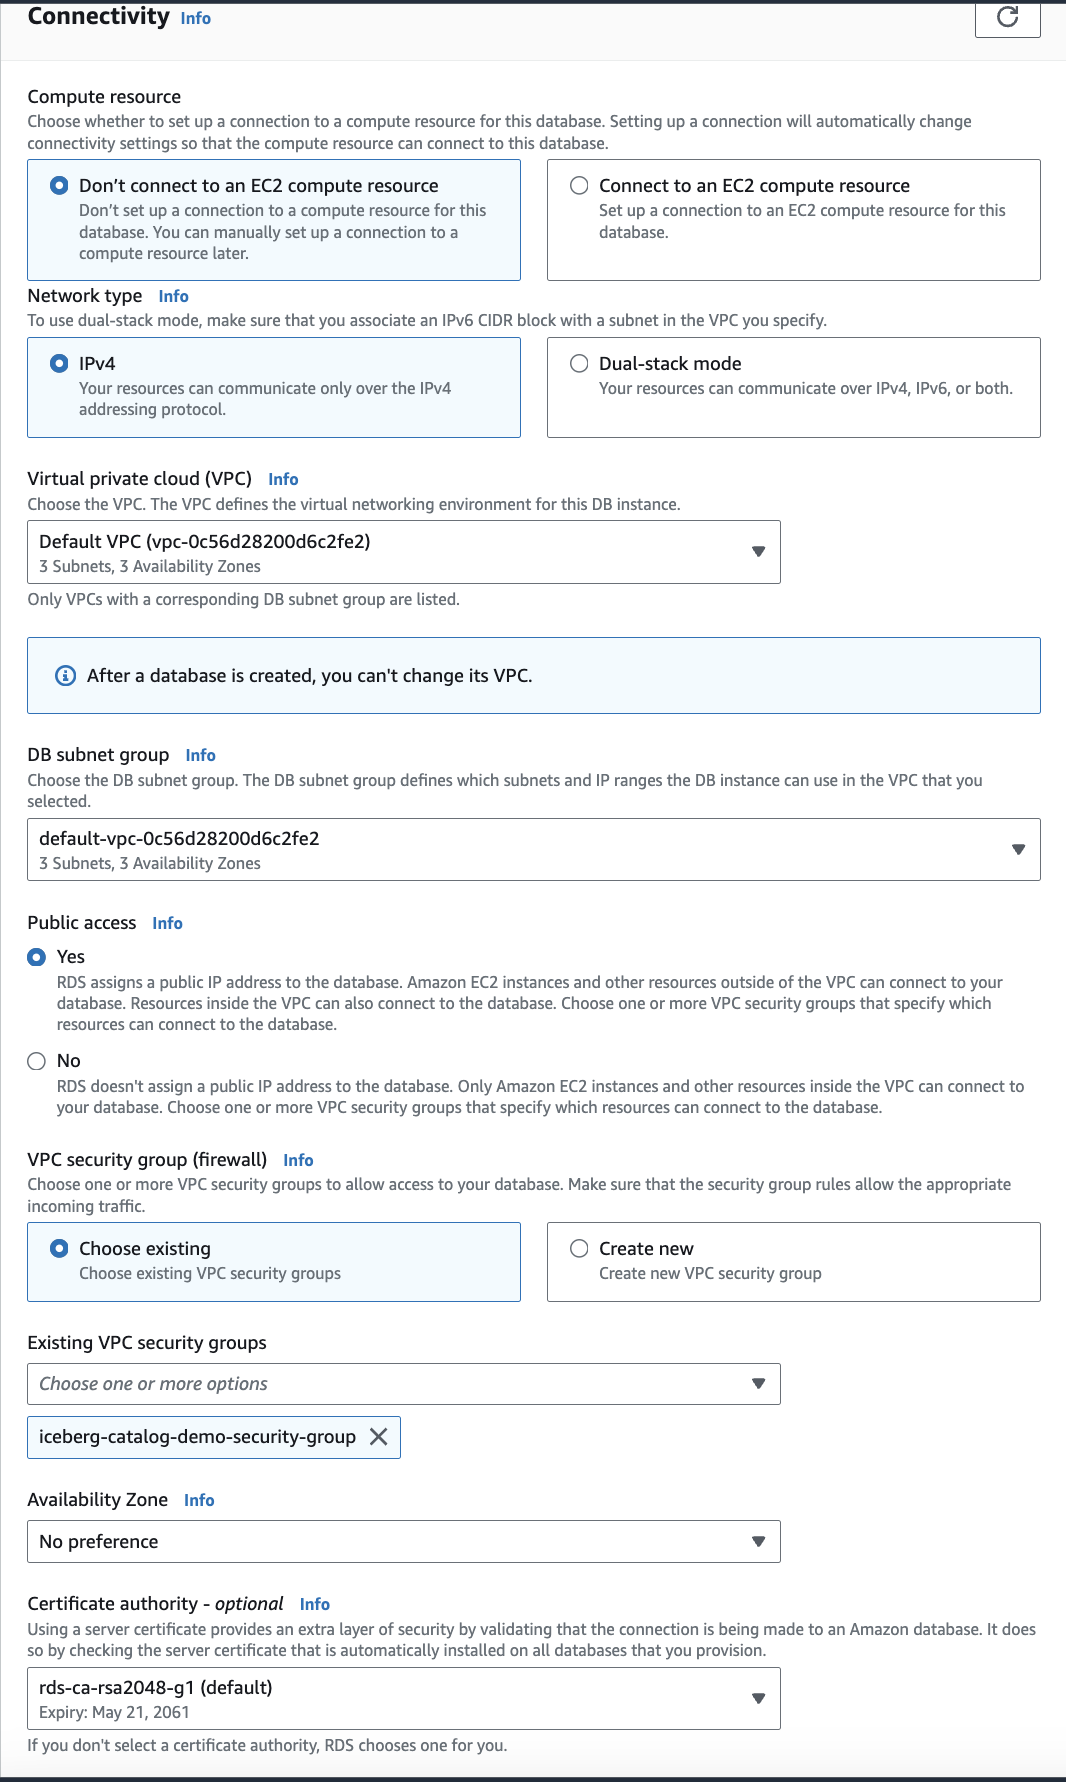
- Once you have made all your configuration choices, click Create Database
It takes a few minutes for Postgres to be spun up but after that completes, click on your new database and lookup the endpoint. With this we can construct your Postgres URI:
postgresql://<USER>:<PASSWORD>@<HOST>:5432/postgres
USERis the user you created (postgresby default)PASSWORDis the password you created or found in Secrets Manager (make sure it is percent encoded)HOSTis the endpoint of your instance
Save this URI since we will use this later.
Setting Up S3
- In AWS console go to S3 → Buckets → Create Bucket
- Give your bucket a name (eg
iceberg-s3-demo). You can also choose whether or not you want your bucket to be publicly accessible. - Within your newly created bucket, add a folder called
iceberg-warehouse. We will use this path later to store Iceberg table data and metadata. - Click Create Bucket when done.
Optional: If you chose not to have your bucket publicly accessible, you will need your AWS access keys so that DuckDB can access Iceberg tables saved in S3. To find your AWS access keys checkout out these docs or talk to your AWS account admin.
Creating The Catalog
Now that we have Postgres and S3 set up we can create the catalog. To do this we will use PyIceberg, a Python library for interacting with Iceberg. The following code registers a name space called taxi (we will use the NYC taxi data set again) in the Postgres catalog. The catalog will eventually contain pointers to where the data and metadata are saved in S3:
from pyiceberg.catalog.sql import SqlCatalog
import os
# set the region for where your s3 bucket if different from your default region
os.environ['AWS_DEFAULT_REGION'] = 'us-east-2'

# create Iceberg catalog using Postgres and GCS
catalog_name = "demo_iceberg"
catalog_uri = "<YOUR_POSTGRES_URI>" #replace with Postgres URI
warehouse_path = "s3://<YOUR_S3_PATH>" #replace with bucket name you created in S3

catalog = SqlCatalog(
    catalog_name,
    **{
        "uri": catalog_uri,
        "warehouse": warehouse_path,
    },
)

# create a namespace for Iceberg
name_space = 'taxi'
try:
    catalog.create_namespace(name_space)
except Exception as e:
    print(e)
Note, you may need to authenticate AWS first: aws sso login
If you examine the contents of the Postgres database, you should see this (queried via dbeaver, but any other editor or psql will work):
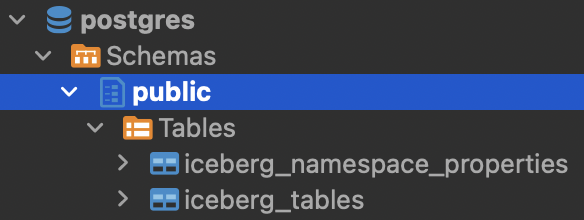
iceberg_namespace_properties will contain one row detailing the taxi namespace we just created whereas iceberg_tables will be empty since we haven’t created any Iceberg tables yet.
Loading Data Into Iceberg
Now that we have the Postgres catalog setup and pointing to our cloud storage bucket, we can create Iceberg tables and start loading data. This part will be largely similar to the previous post in which we loaded some data from the NYC taxi data set.
First we get the data from the NYC taxi site and convert it to PyArrow format:
import duckdb
import pyarrow as pa

# get Q2 2023 to through april 2024 (latest available data)
trips_ls = []
months = [
    '2023-04',
    '2023-05',
    '2023-06',
    '2023-07',
    '2023-08',
    '2023-09',
    '2023-10',
    '2023-11',
    '2023-12',
    '2024-01',
    '2024-02',
    '2024-03',
    '2024-04'
    ]
for month in months:
    table_path = f'https://d37ci6vzurychx.cloudfront.net/trip-data/yellow_tripdata_{month}.parquet'
    # NOTE: this initial data read doesn't require Duckdb, something like pandas works as well
    table = duckdb.sql(f"SELECT * FROM '{table_path}'").arrow()
    trips_ls.append(table)

# concatenate all trips tables
trips = pa.concat_tables(trips_ls)
print("Rows in trips: ",trips.num_rows)

# get location zone mapping
zones = duckdb.sql("SELECT * FROM 'https://d37ci6vzurychx.cloudfront.net/misc/taxi_zone_lookup.csv'").arrow()
print("Rows in zones: ",zones.num_rows)
Note: we use DuckDB for the initial data read from the taxi site but it’s not required, something like pandas would also work.
Before creating the Iceberg tables, we also define a helper function that ensures that every table’s catalog and metadata are properly synced. This is to address the Github issue mentioned **here:**
import gcsfs
import boto3

def add_version_hint(iceberg_table):
    """
    Adds version hint file to Iceberg table metadata
    Addresses issue mentioned here: https://github.com/duckdb/duckdb-iceberg/issues/29
    Determines if Iceberg table is in local file system or in GCS/S3
    """
    metadata_location = iceberg_table.metadata_location
    protocol = metadata_location.split(":")[0]

    if protocol == "file":
        metadata_location = metadata_location[7:]
    elif protocol == "gs" or protocol == "s3":
        metadata_location = metadata_location[5:]
    else:
        print(f"Unsupported metadata location: {metadata_location}")
        return

    metadata_dir = os.path.dirname(metadata_location)
    new_metadata_file = os.path.join(metadata_dir, "v1.metadata.json")
    version_hint_file = os.path.join(metadata_dir, "version-hint.text")

    if protocol == "file":
        shutil.copy(metadata_location, new_metadata_file)
        with open(version_hint_file, "w") as f:
            f.write("1")
    elif protocol == "gs":
        fs = gcsfs.GCSFileSystem()
        fs.copy(metadata_location, new_metadata_file)
        with fs.open(version_hint_file, "w") as f:
            f.write("1")
    elif protocol == "s3":
        s3 = boto3.client('s3')
        bucket_name = metadata_location.split('/')[0]
        s3_file_key = '/'.join(metadata_location.split('/')[1:])
        new_s3_file_key = os.path.join(os.path.dirname(s3_file_key), "v1.metadata.json")
        version_hint_key = os.path.join(os.path.dirname(s3_file_key), "version-hint.text")

        s3.copy({'Bucket': bucket_name, 'Key': s3_file_key}, bucket_name, new_s3_file_key)
        s3.put_object(Bucket=bucket_name, Key=version_hint_key, Body='1')

    print(f"Copied metadata file to {new_metadata_file}")
    print(f"Created {version_hint_file} with content '1'")
Ok let’s create the Iceberg tables and load the taxi data. The code below registers the Iceberg tables in the Postgres catalog, loads the data and metadata into the S3 bucket, and then adds the version hint files for each table into S3:
# add tables to iceberg catalog and load data into S3
for table, table_name in [
    (trips, "trips"),
    (zones, "zones"),
]:
	# create the iceberg table
    iceberg_table = catalog.create_table(
        f"{name_space}.{table_name}",
        schema=table.schema,
    )

    # add data to iceberg table in GCS
    iceberg_table.append(table)

    # copy catalog version hint metadata into GCS
    add_version_hint(iceberg_table)

    print(f"Created {table_name}, {table.num_rows} rows")
Let’s take a peek at what the above code just did. If we go into the iceberg_tables table in the Postgres catalog we should see that two tables were created:
 We can see that we created a
 trips and a zones table. Each table also has a metadata_location which points to a location in S3 where the metadata for each table is saved. In our case the metadata for the trips table is saved here in S3:
s3://iceberg-s3-demo/iceberg-warehouse/taxi.db/trips/metadata/00001-f38b149f-75cf-465f-b658-81b05f9fd3b8.metadata.json
Let’s head over to S3 to examine whats in there. In the iceberg-s3-demo/iceberg-warehouse/taxi.db/trips directory we see two folders:
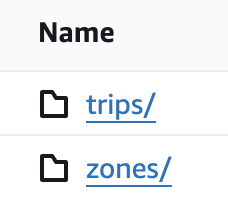 Within the metadata folder lies our metadata file which was referenced in the Postgres catalog. Without getting too much into the weeds, this metadata file contains important information for the
 trips table such as where the data is, how the table is partitioned, etc. For a deeper understanding of how the metadata file works this blog post is a great explainer.
Within the data folder is our actual data saved as parquet files. The metadata file will instruct the query engine where and how to read data from this folder:

Querying With DuckDB
With our Iceberg tables created and data loaded we can now query them. We demonstrate two ways to do this:
- Using DuckDB to locally query remote Iceberg tables in cloud storage
- Running DuckDB on a cloud VM to query remote Iceberg tables in cloud storage
Local DuckDB
Using a local DuckDB setup to query our cloud hosted Iceberg tables is similar to the approach shown in a previous post except we point DuckDB at cloud storage instead of local files. To give our local DuckDB access to our S3 bucket we need to use our AWS Access and Secret keys as well as specifying the region of our S3 bucket.
import duckdb

con = duckdb.connect(database=':memory:', read_only=False)
setup_sql = '''
INSTALL iceberg;
LOAD iceberg;

CREATE SECRET (
    TYPE S3,
    KEY_ID '<YOUR_AWS_KEY>',
    SECRET '<YOUR_AWS_SECRET_KEY>',
    REGION '<YOUR_AWS_REGION>'
);
'''
res = con.execute(setup_sql)
We then create a taxi schema and views of the trips and zones tables in DuckDB:
warehouse_path = "s3://YOUR_BUCKET"
name_space = 'taxi'

# create the schema and views of iceberg tables in duckdb
database_path = f'{warehouse_path}/{name_space}.db'

create_view_sql = f'''
CREATE SCHEMA IF NOT EXISTS taxi;

CREATE VIEW taxi.trips AS
SELECT * FROM iceberg_scan('{database_path}/trips', allow_moved_paths = true);

CREATE VIEW taxi.zones AS
SELECT * FROM iceberg_scan('{database_path}/zones', allow_moved_paths = true);
'''

con.execute(create_view_sql)
We can now run queries against the Iceberg tables in S3 using DuckDB. For example this query retrieves monthly aggregated trip statistics:
sql = f'''
select
    date_trunc('month', tpep_pickup_datetime) as month,
    avg(passenger_count) as avg_passenger_count,
    avg(trip_distance) as avg_trip_distance,
    sum(trip_distance) as total_trip_distance,
    avg(total_amount) as avg_total_amount,
    sum(total_amount) as total_amount,
    count(*) as total_trips
from taxi.trips
-- some data pre and post our target date range is in the dataset, so we filter it out
where tpep_pickup_datetime between '2023-04-01' and '2024-05-01'
group by 1
order by 1
'''

%time res = con.execute(sql)
res.fetchdf()
An example notebook of setting up the catalog, loading data, and querying Iceberg tables with a local DuckDB instance can be found here.
Deploy DuckDB In A Cloud VM
Flask App Set Up and Testing
To run DuckDB in a VM we will deploy a Flask app with an endpoint that executes DuckDB sql queries against objects in S3 and returns the results. The file structure of our app looks like this:
deploy_duckdb
  ├── config.py
  ├── main.py
  ├── requirements.txt
  └── build_cloud_run.sh
The contents of each file can be found in the repo here. For this post we will briefly go over main.py and config.py.
# main.py
import duckdb
from flask import Flask, request, jsonify
import boto3
from botocore.exceptions import ClientError
import config
import json

app = Flask(__name__)

# gets secrets from aws secret manager
def get_secret(secret_name, region_name):
    session = boto3.session.Session()
    client = session.client(
        service_name='secretsmanager',
        region_name=region_name
    )

    try:
        get_secret_value_response = client.get_secret_value(
            SecretId=secret_name
        )
    except ClientError as e:
        raise e

    secret = json.loads(get_secret_value_response['SecretString'])
    return secret.get('secret_key')

def init_duckdb_connection():
    access_key = config.ACCESS_KEY
    secret_key = get_secret(config.SECRET_KEY_NAME, config.SECRET_REGION)
    con = duckdb.connect()
    setup_sql = f"""
        INSTALL iceberg;
        LOAD iceberg;

        INSTALL httpfs;
        LOAD httpfs;

        CREATE SECRET (
            TYPE S3,
            KEY_ID '{access_key}',
            SECRET '{secret_key}',
            REGION '{config.S3_BUCKET_REGION}'
        );
    """
    con.execute(setup_sql)
    return con

# global duckdb connection
duckdb_conn = init_duckdb_connection()

@app.route("/query", methods=["POST"])
def query_iceberg():
    try:
        query = request.args.get("query")
        if not query:
            return jsonify({"error": "Query parameter 'query' is required"}), 400
        result = duckdb_conn.execute(query).fetchall()
        return jsonify({"result": result}), 200
    except Exception as e:
        return jsonify({"error": str(e)}), 500

if __name__ == "__main__":
    app.run(host='0.0.0.0', port=5000, debug=True)
Notice that init_duckdb_connection() is used to initialize a DuckDB database upon app creation that has access to the S3 buckets and can be called upon for queries. Within init_duckdb_connection() there is a request to get the secret key from Secrets Manager. We configure the project id and secret name in config.py like so:
# config.py
ACCESS_KEY = "<AWS_ACCESS_KEY>"
SECRET_KEY_NAME = "<AWS_SECRET_KEY_NAME>"
S3_BUCKET_REGION = "<S3_BUCKET_REGION>"
SECRET_REGION = "<SECRET_REGION>"
You will want to add your secret key to Secrets Manager. Make sure the name of the secret matches the name in config.py and that the secret region matches the region of your created secret. See here on how to add secrets.
Before we deploy the app to ECS, we will Dockerize it and test it locally first
docker buildx build --platform=linux/amd64  -t duckdb-deploy .
docker run -p 5000:5000 -v ~/.aws:/root/.aws -it duckdb-deploy
Two notes:
- We build the container with
--platform=linux/amd64so that it is compatible with AWS ECS architecture - The
docker runcommand will make your AWS credentials accessible to the Docker container when it is run locally.
To test it out locally we can make a query request to the Docker container:
import requests

warehouse_path = "s3://iceberg-s3-demo/iceberg-warehouse/"
name_space = 'taxi'

database_path = f'{warehouse_path}{name_space}.db'

create_view_sql = f'''
CREATE SCHEMA IF NOT EXISTS taxi;

CREATE VIEW taxi.trips AS
SELECT * FROM iceberg_scan('{database_path}/trips', allow_moved_paths = true);
'''

url = 'http://127.0.0.1:5000/query' # localhost
query = {
    "query": create_view_sql
}
response = requests.post(url, params=query)
response.text
Push App To Elastic Container Registry (ECR)
If the above ran successfully we can now push the container to AWS’s Elastic Container Registry (ECR). To do so:
- Go to the AWS console → ECR → Create Repository. Give your repo a name (eg
duckdb-app) and click Create Repository - Click on your newly created repository and go to View Push Commands which should bring up a screen like this:
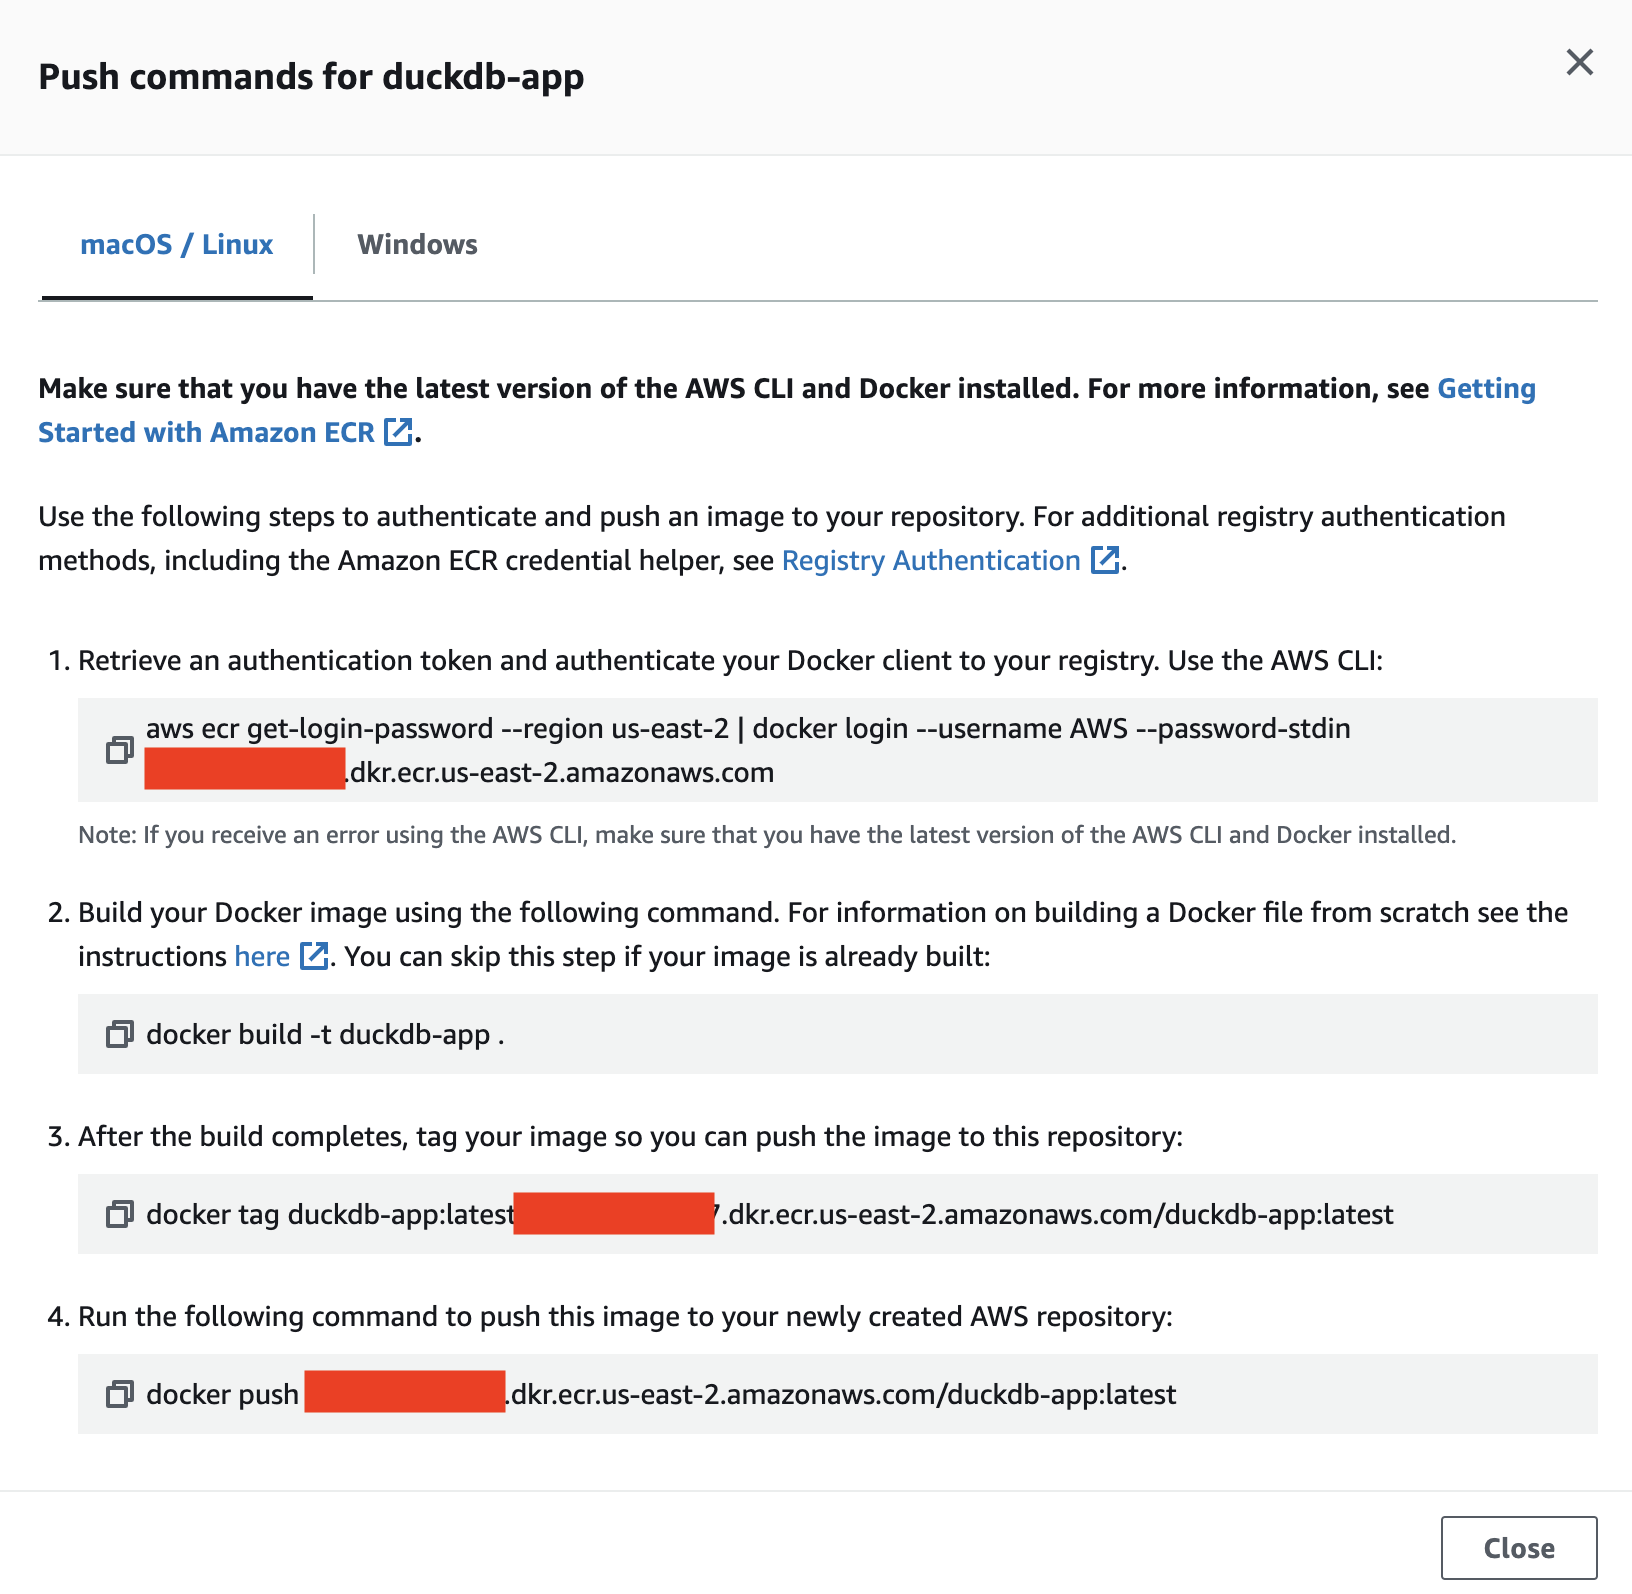
- Follow the instructions on the screen. If your local machine has an Apple M series chip, replace step 2 in the push instructions with
docker buildx build --platform=linux/amd64 -t duckdb-app ., which will make the build compatible with ECS.
Create A Role For The App
We need to create a role that has access to Secrets Manager, which we will later assign to the app:
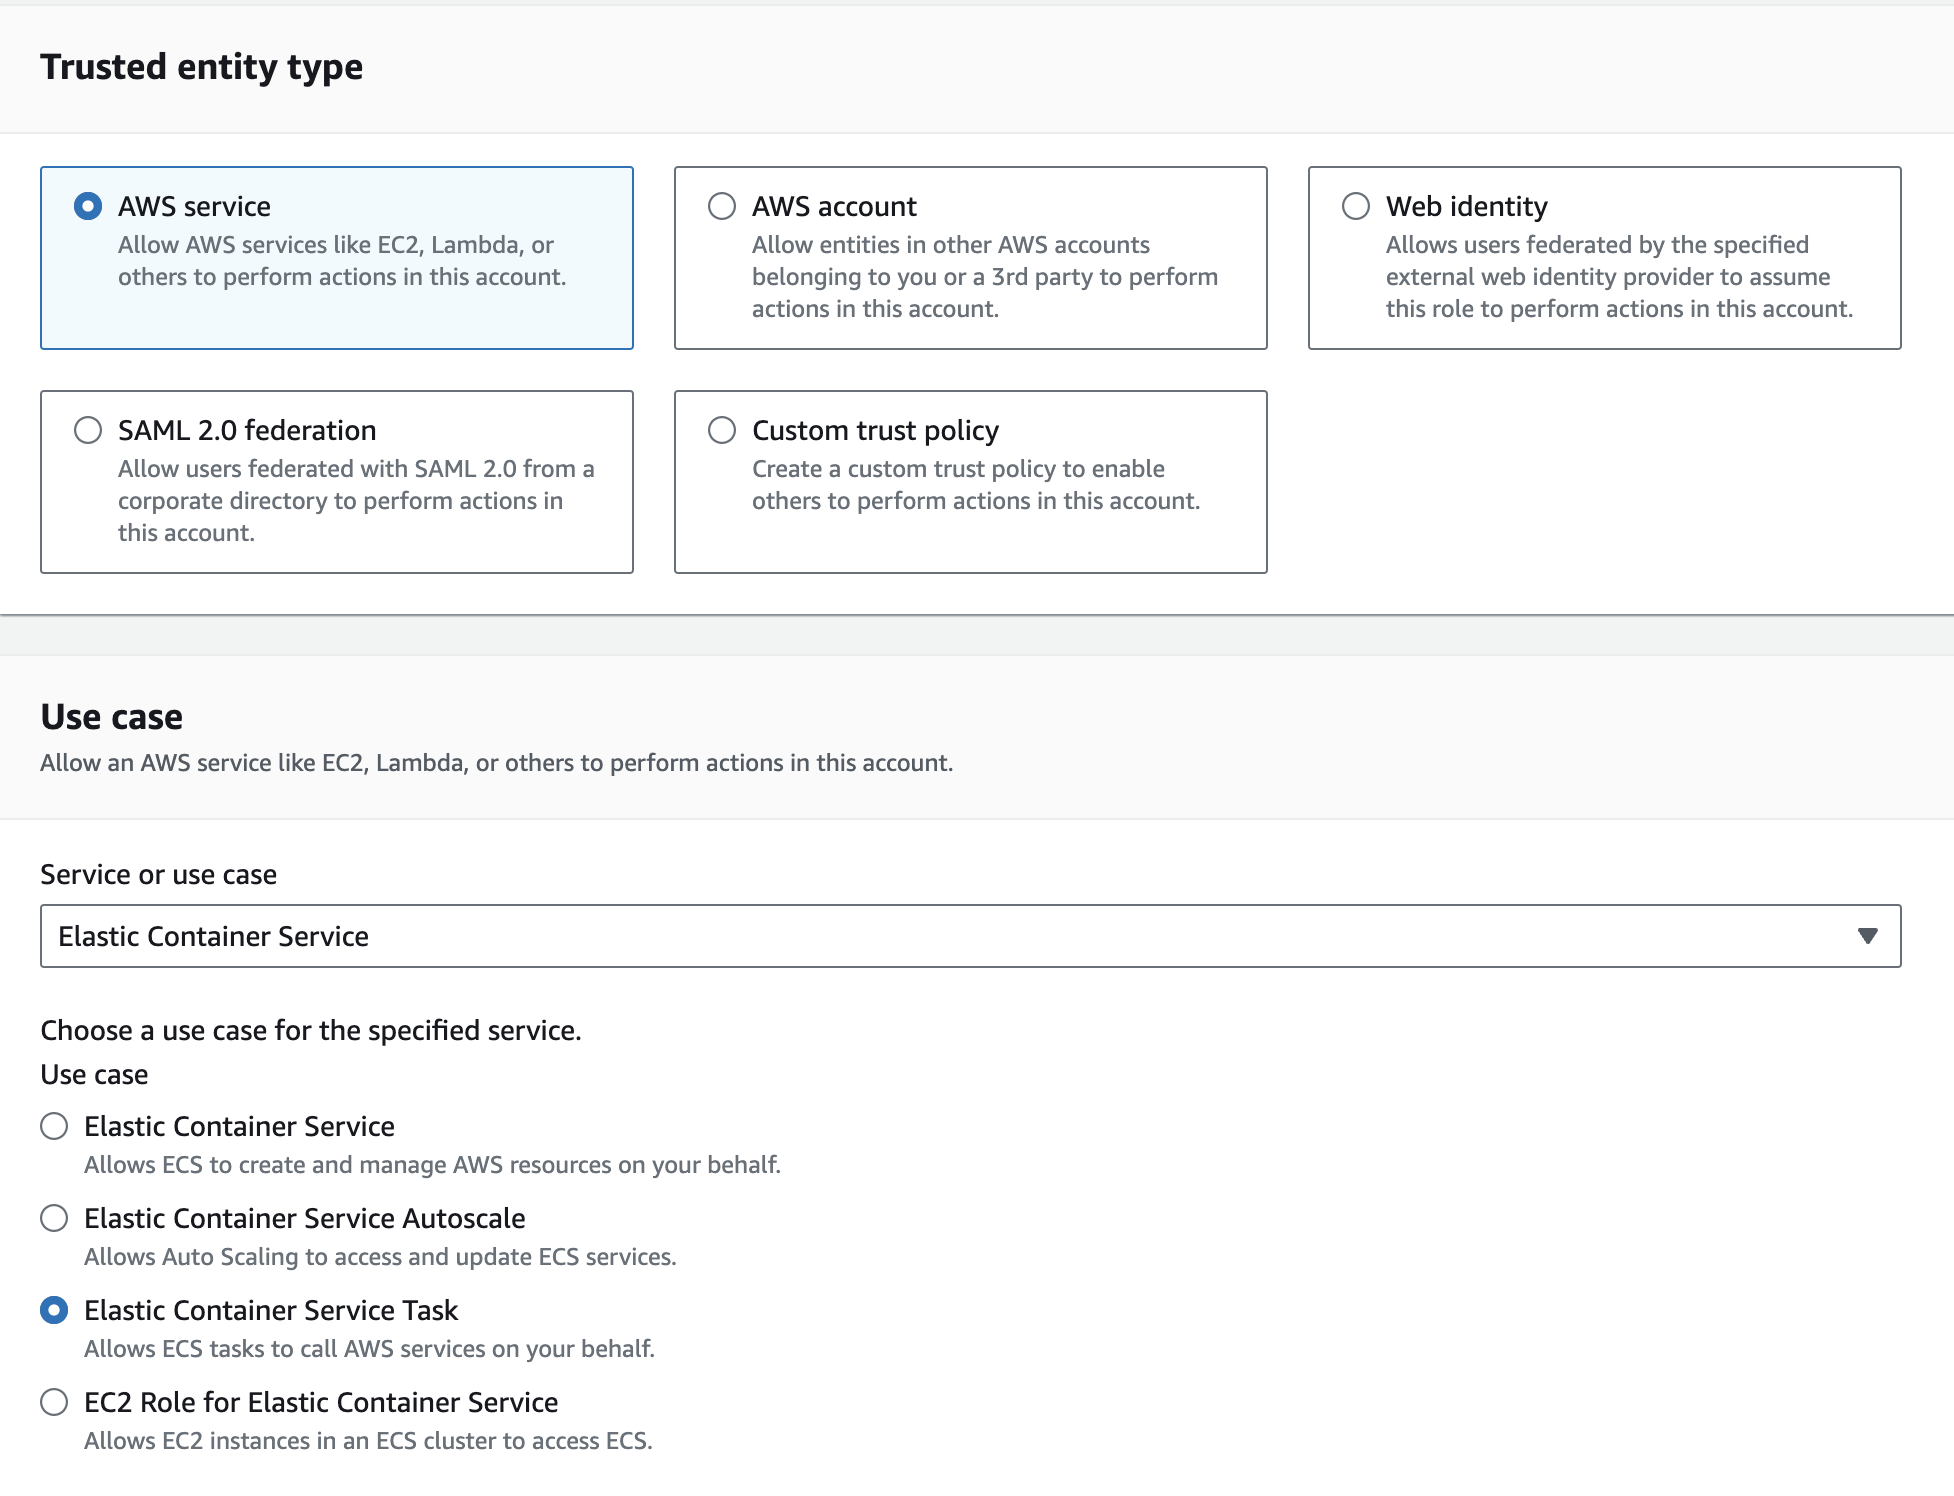
- In AWS console go to IAM → Roles → Create role
- Under Trusted Entity Type select AWS service and Elastic Container Service Task. Then click Next.
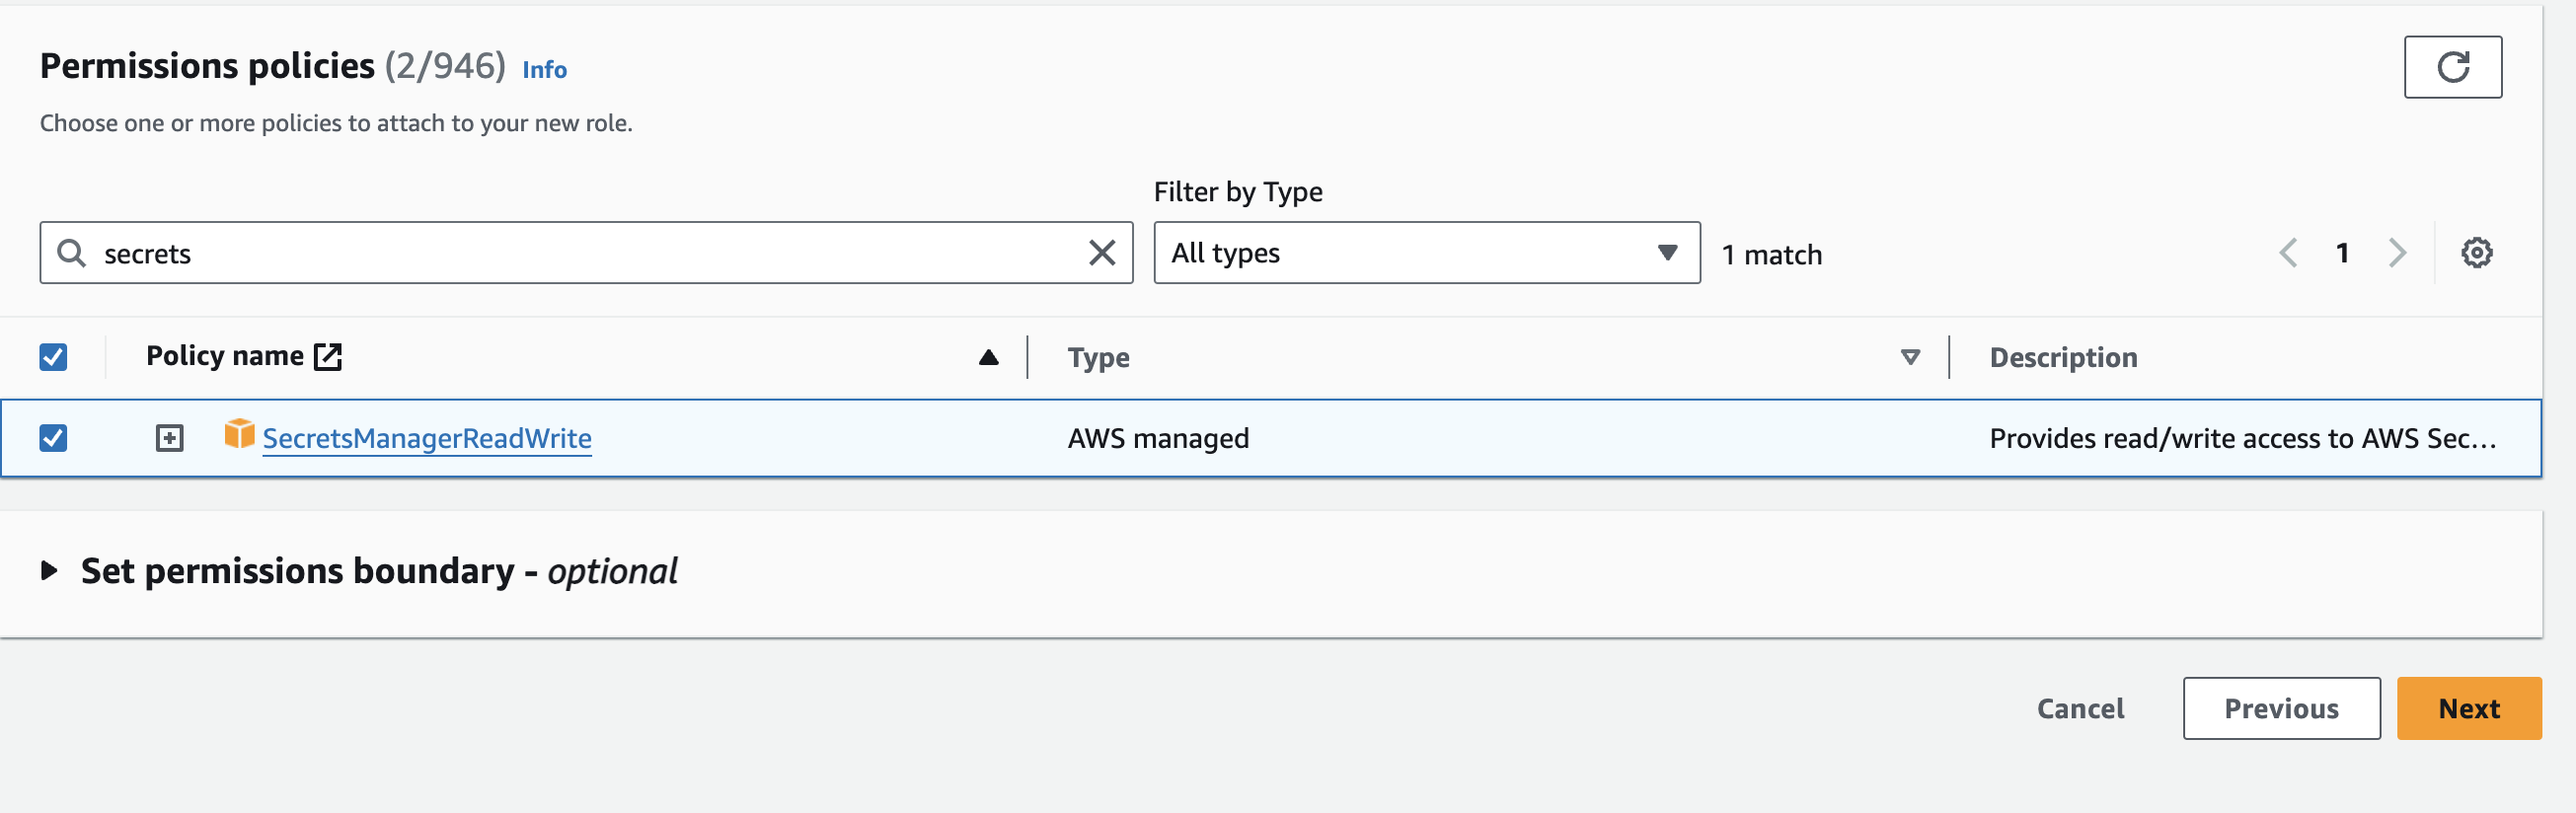
- On the next screen add the SecretsManagerReadWrite Policy to the role. Click Next.
Create Elastic Container Service Cluster and Task
We will now create a VM and deploy our app to it:
- In the AWS console go to ECS → Create Cluster
- Give the cluster a name (eg
duckdb-app-cluster) and select AWS Fargate under the infrastructure setting. Click Create when done.
Once the cluster is set up is complete we will create a Task and assign it to the cluster:
- In the ECS page, click on Task Definitions in the left sidebar then Create New Task Definition
- Give your task a name (eg
duckdb-app-task) - Under infrastructure requirements make sure you select the role you just created under the
Task rolesection. For Task execution role you can have AWS create a new role. The following screenshot shows our infrastructure setup configurations: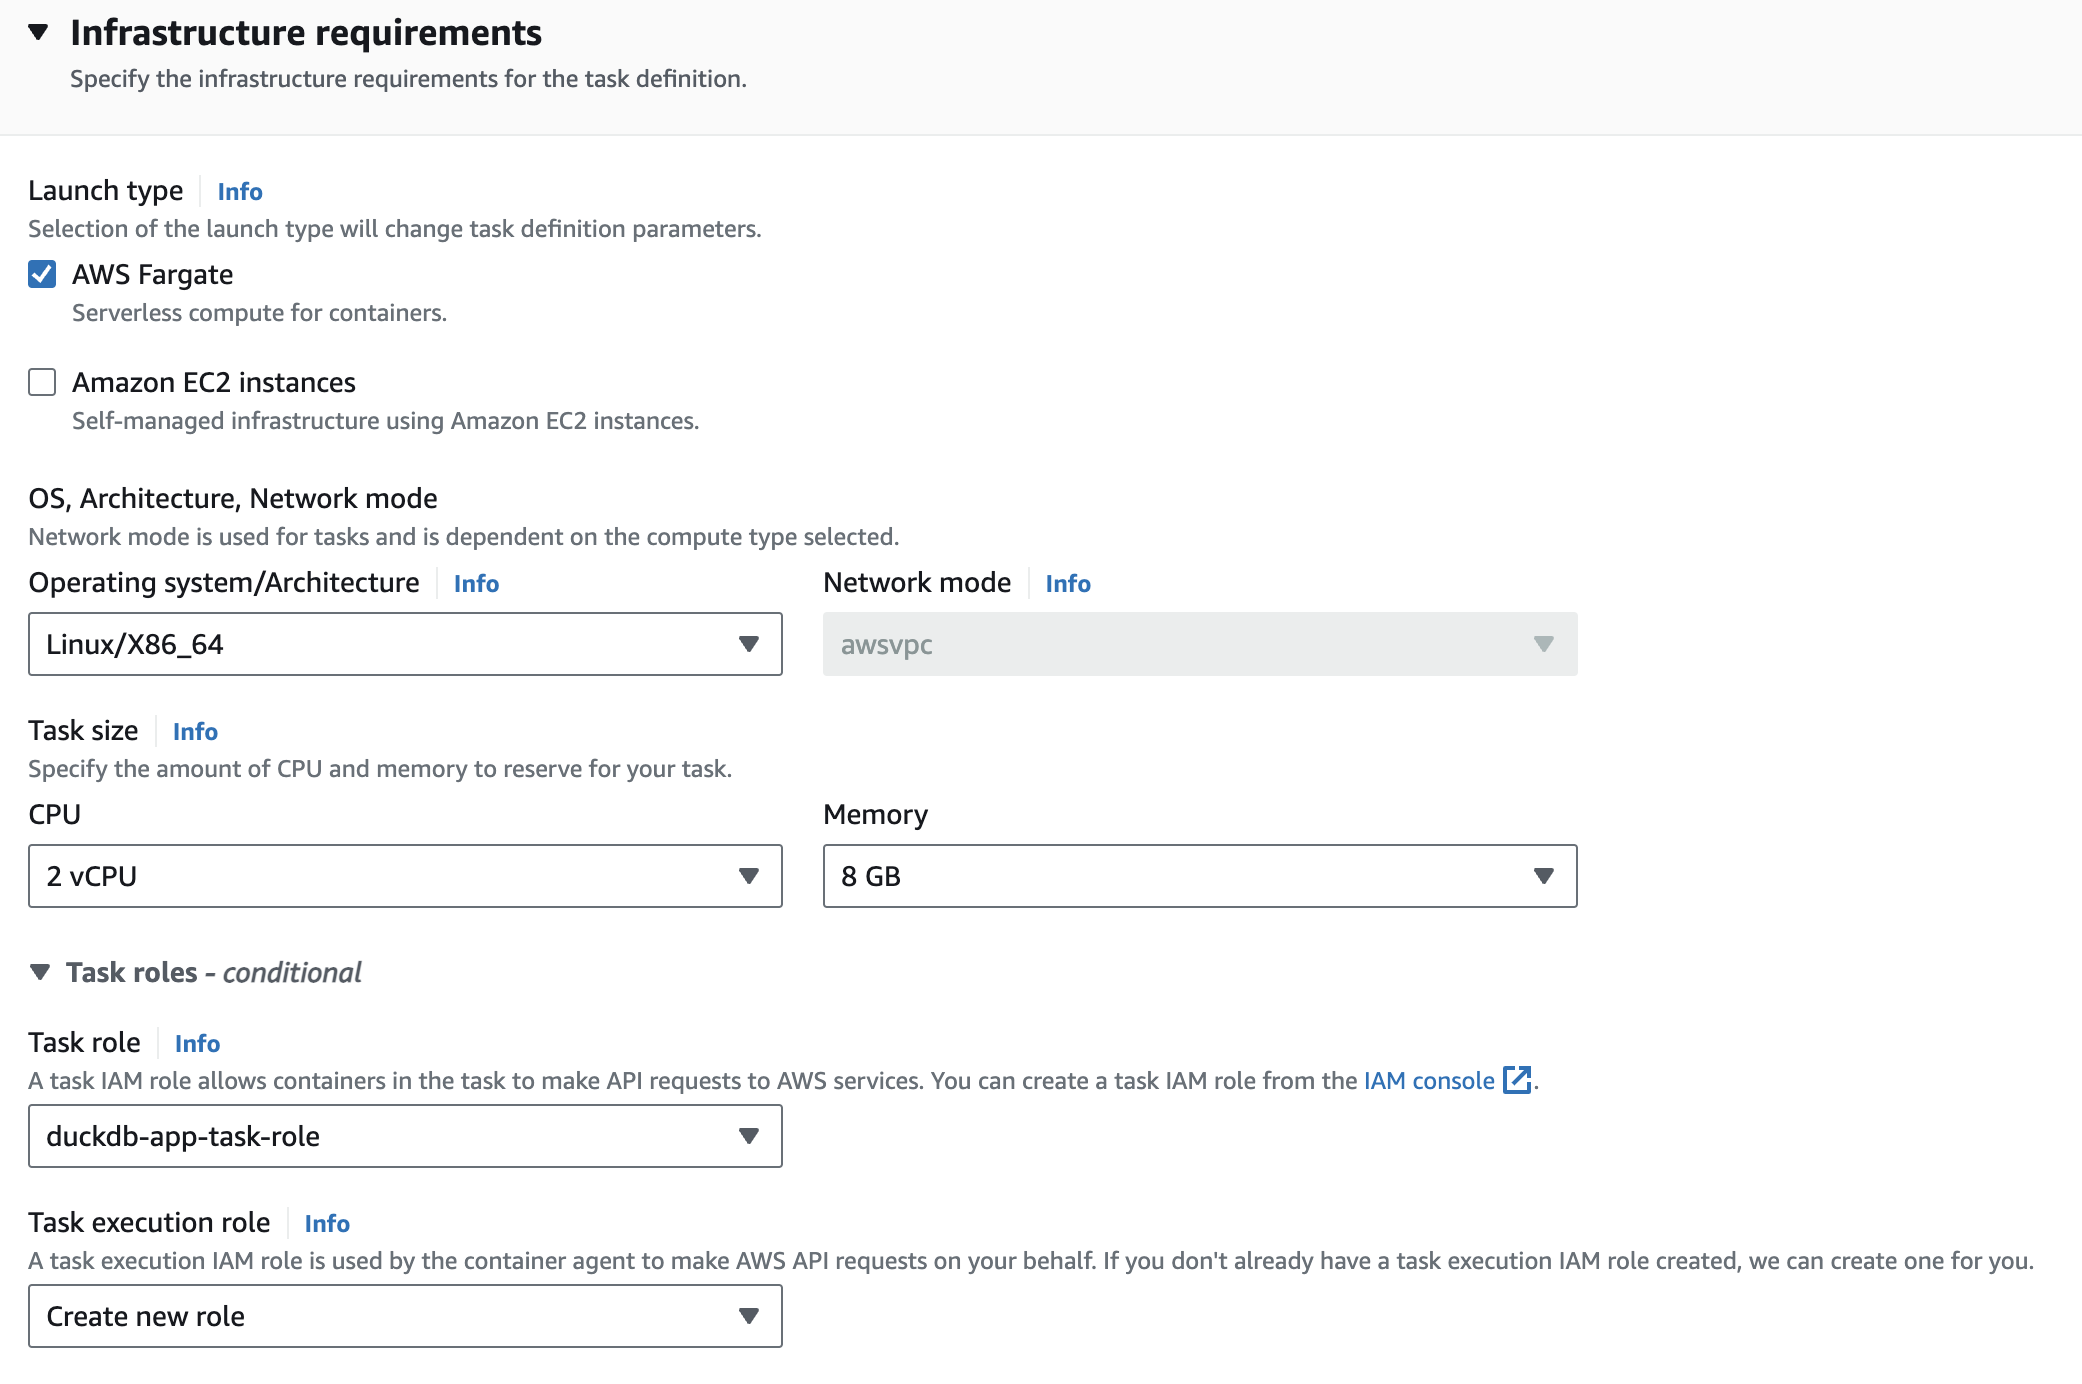
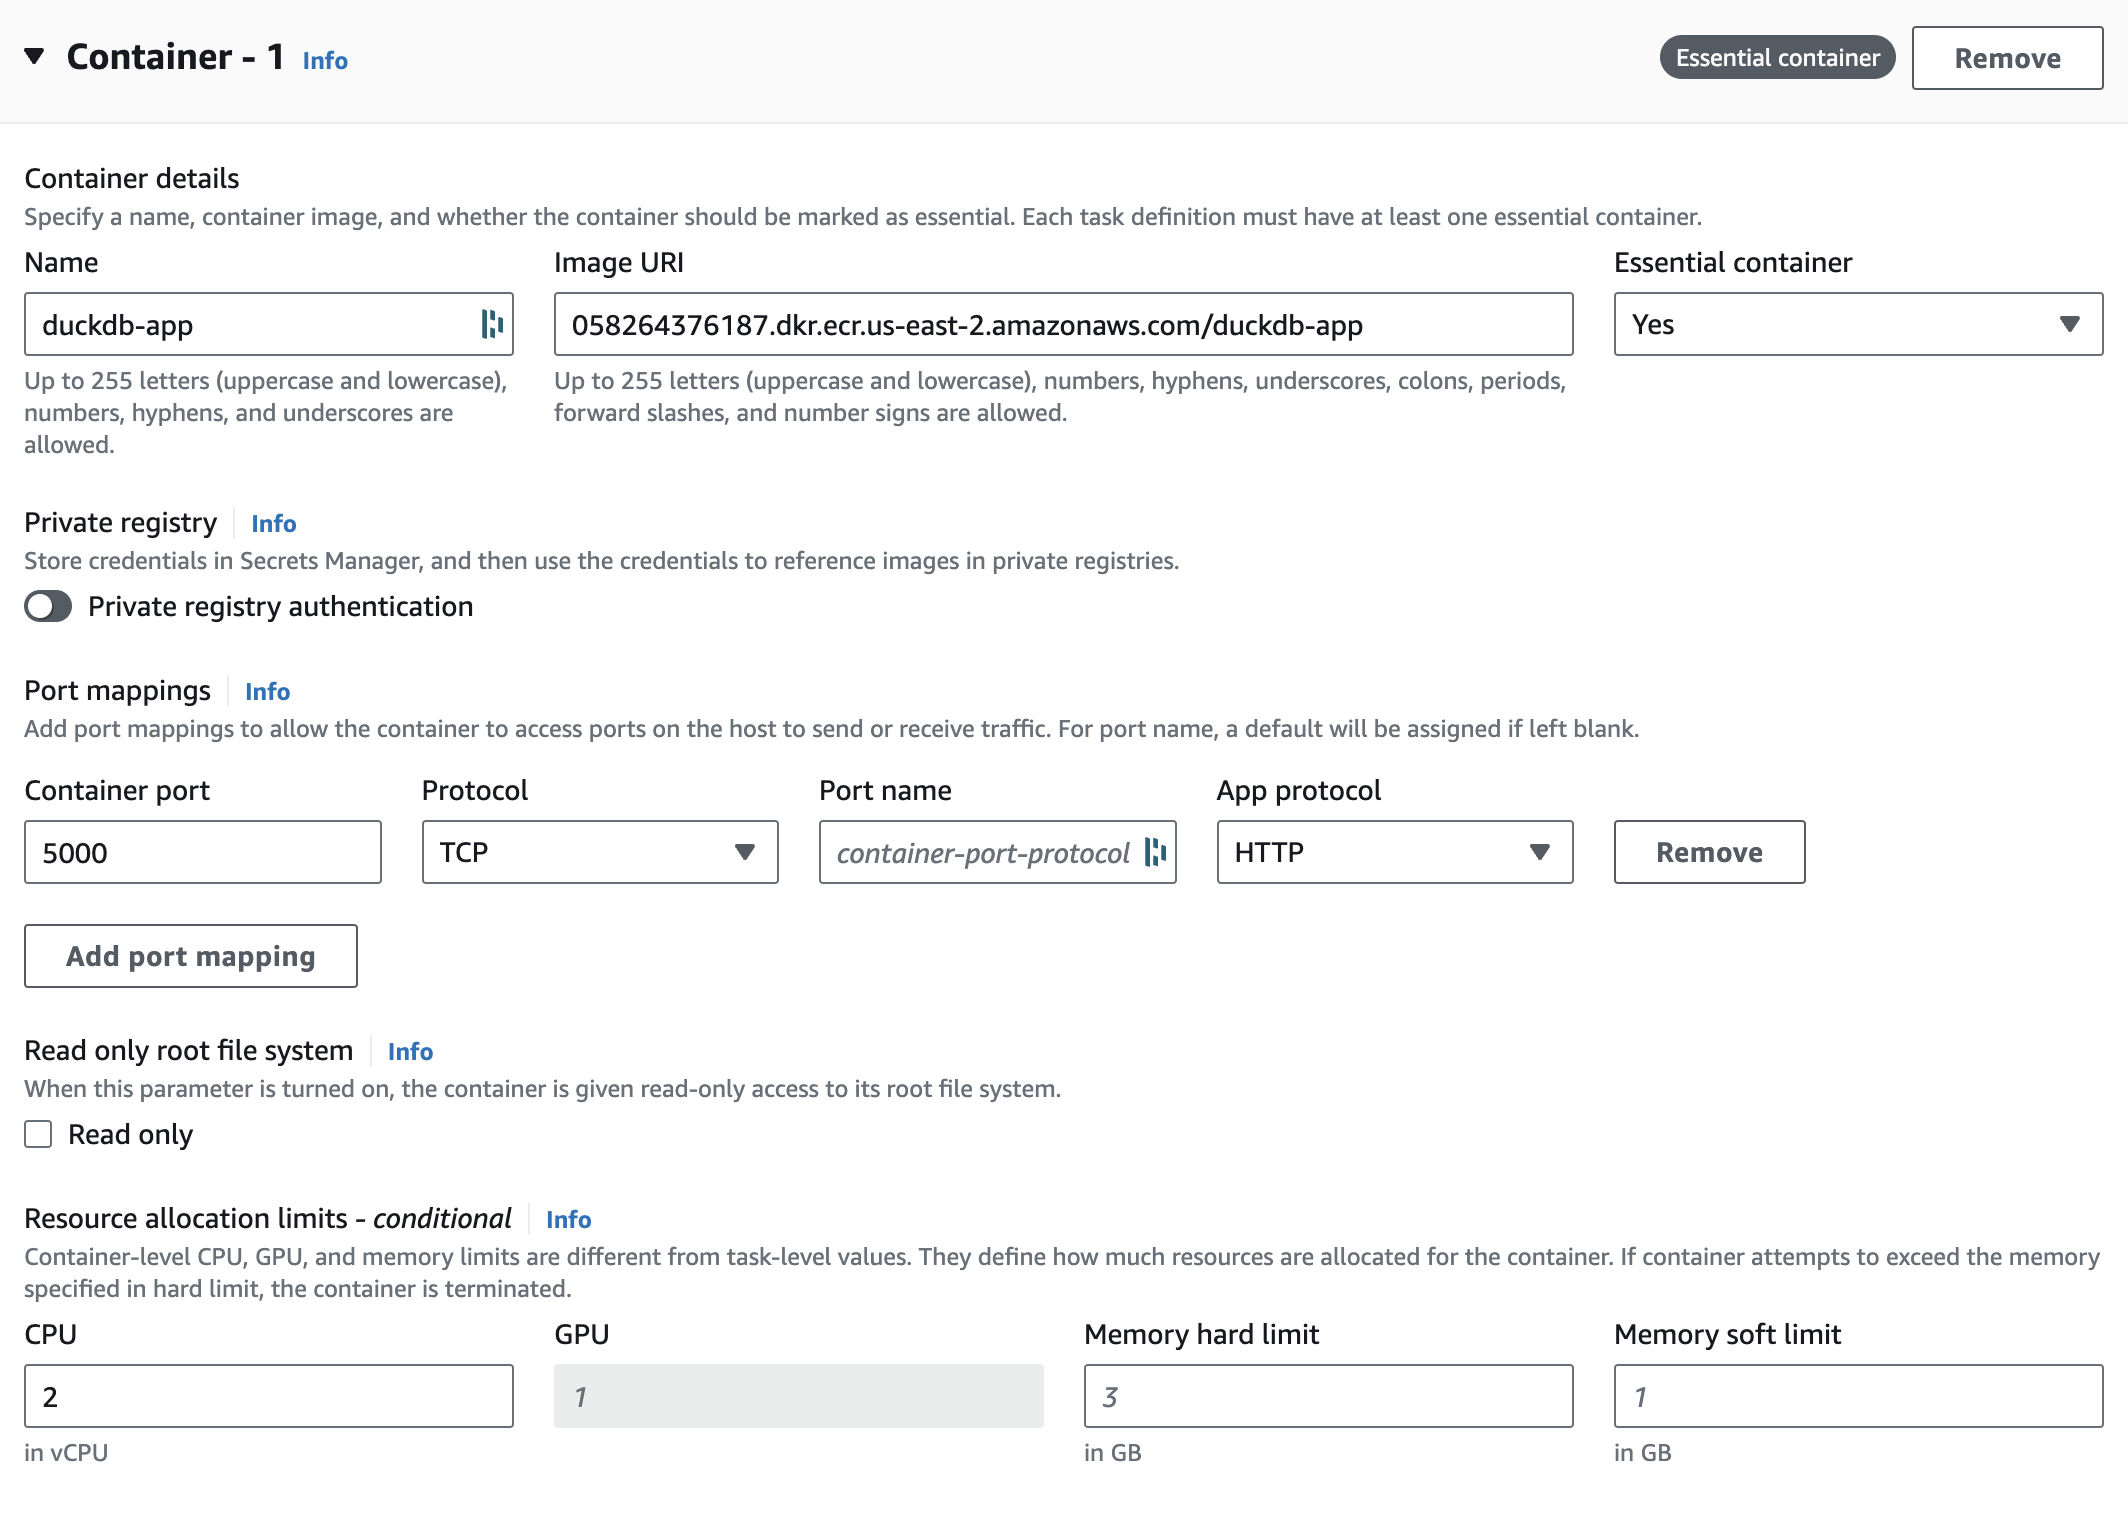
- Under the Container section select the container and Image URI you pushed to ECR. Make sure to expose port 5000 and then hit Create.
Now we will deploy the task to our ECR cluster:
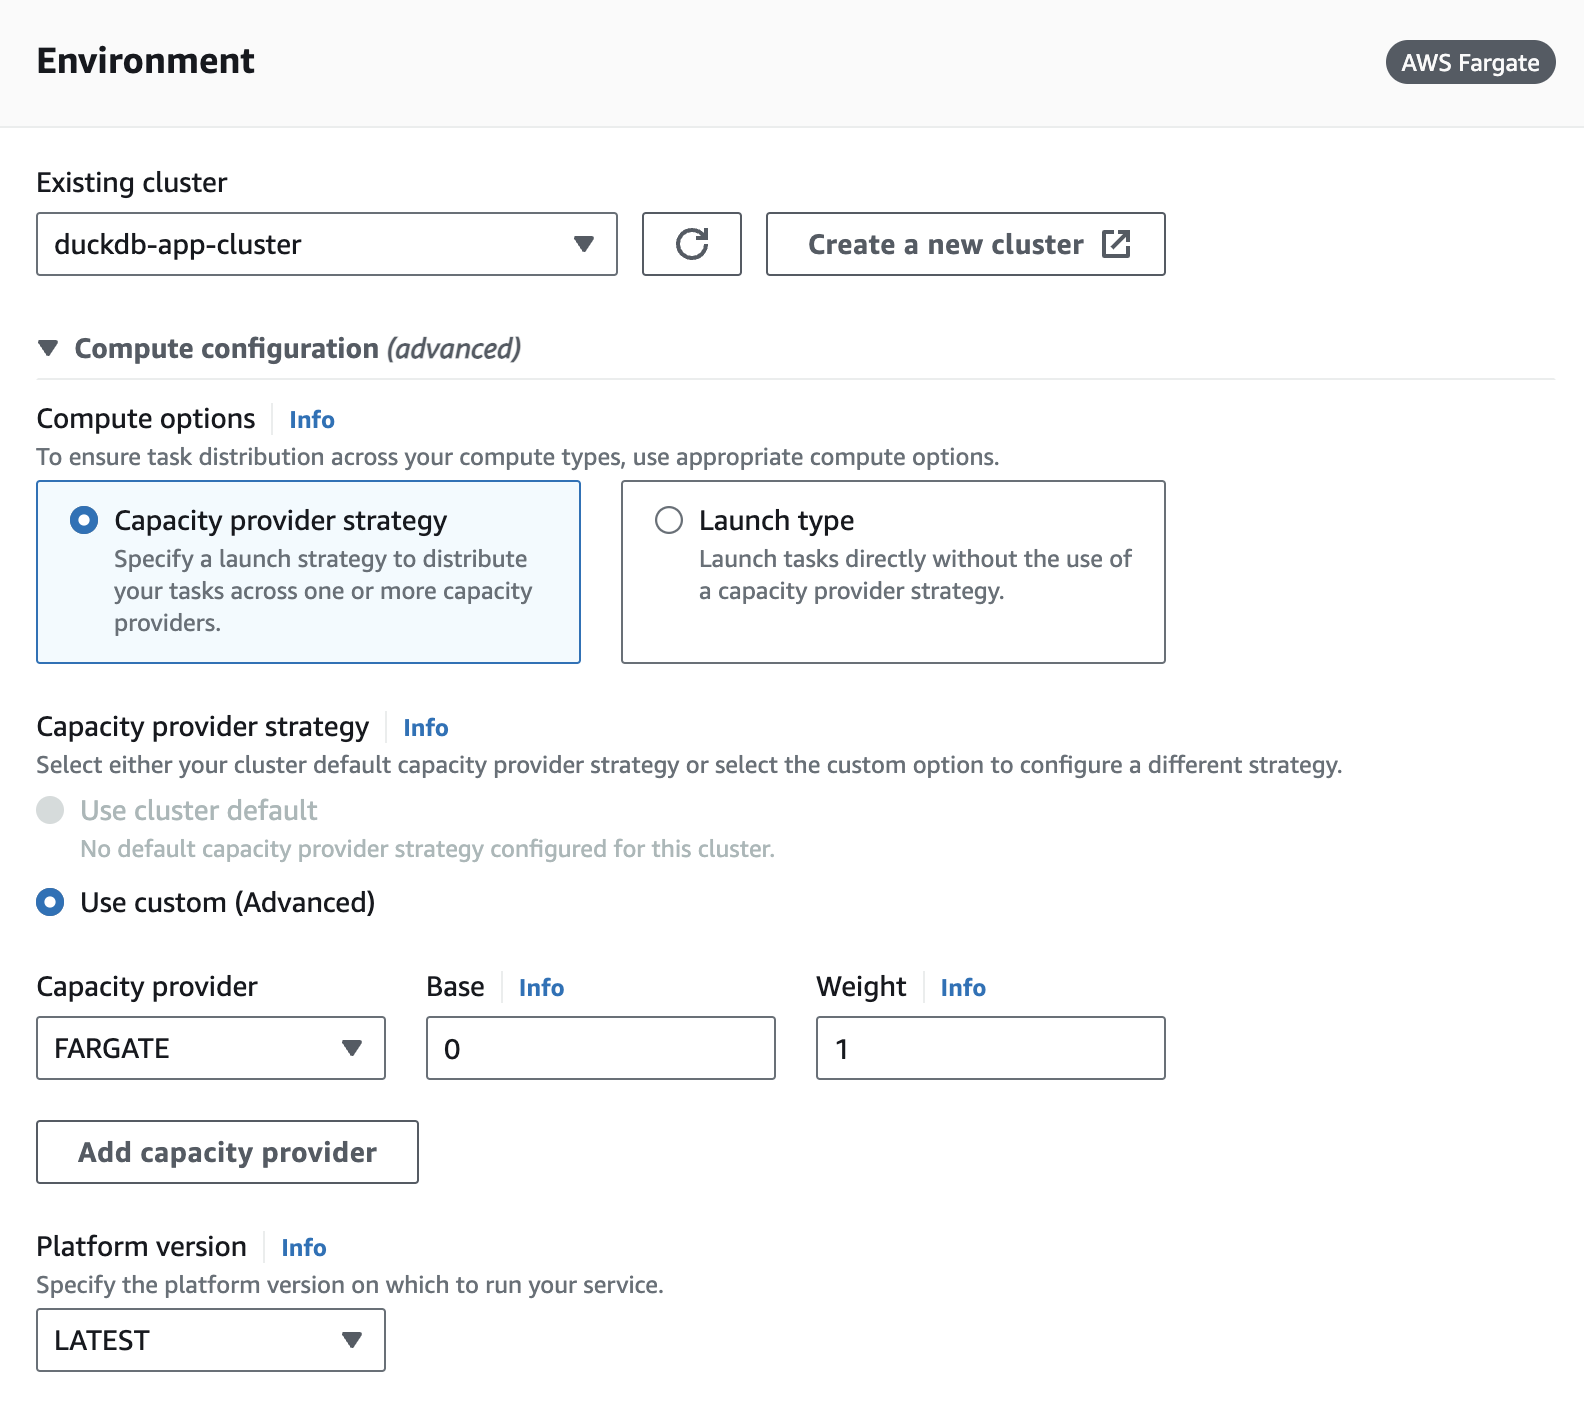
- Go to the Task Definition you just created and click Deploy → Run Task
- Under environment select the cluster we created:
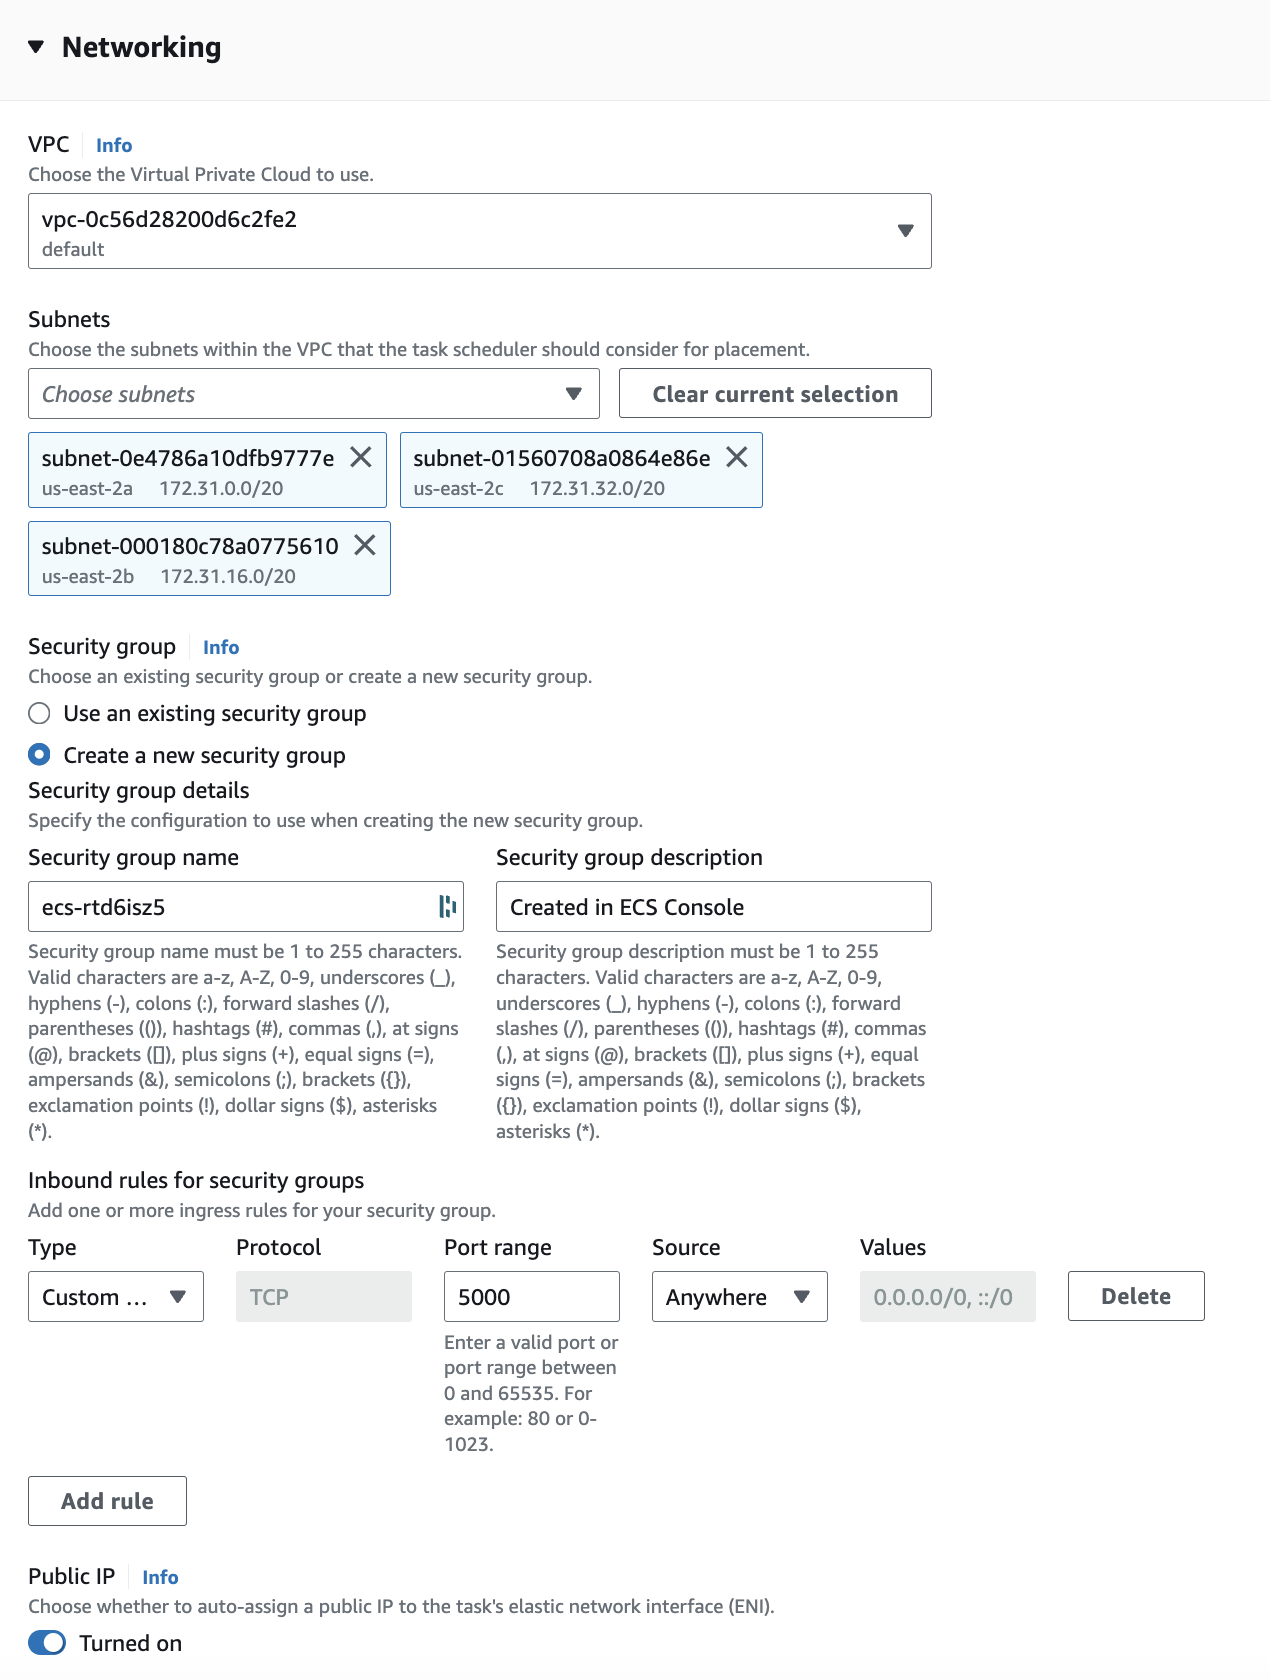
- Under Networking we will want to create a new Security Group with port 5000 exposed to any inbound IP:
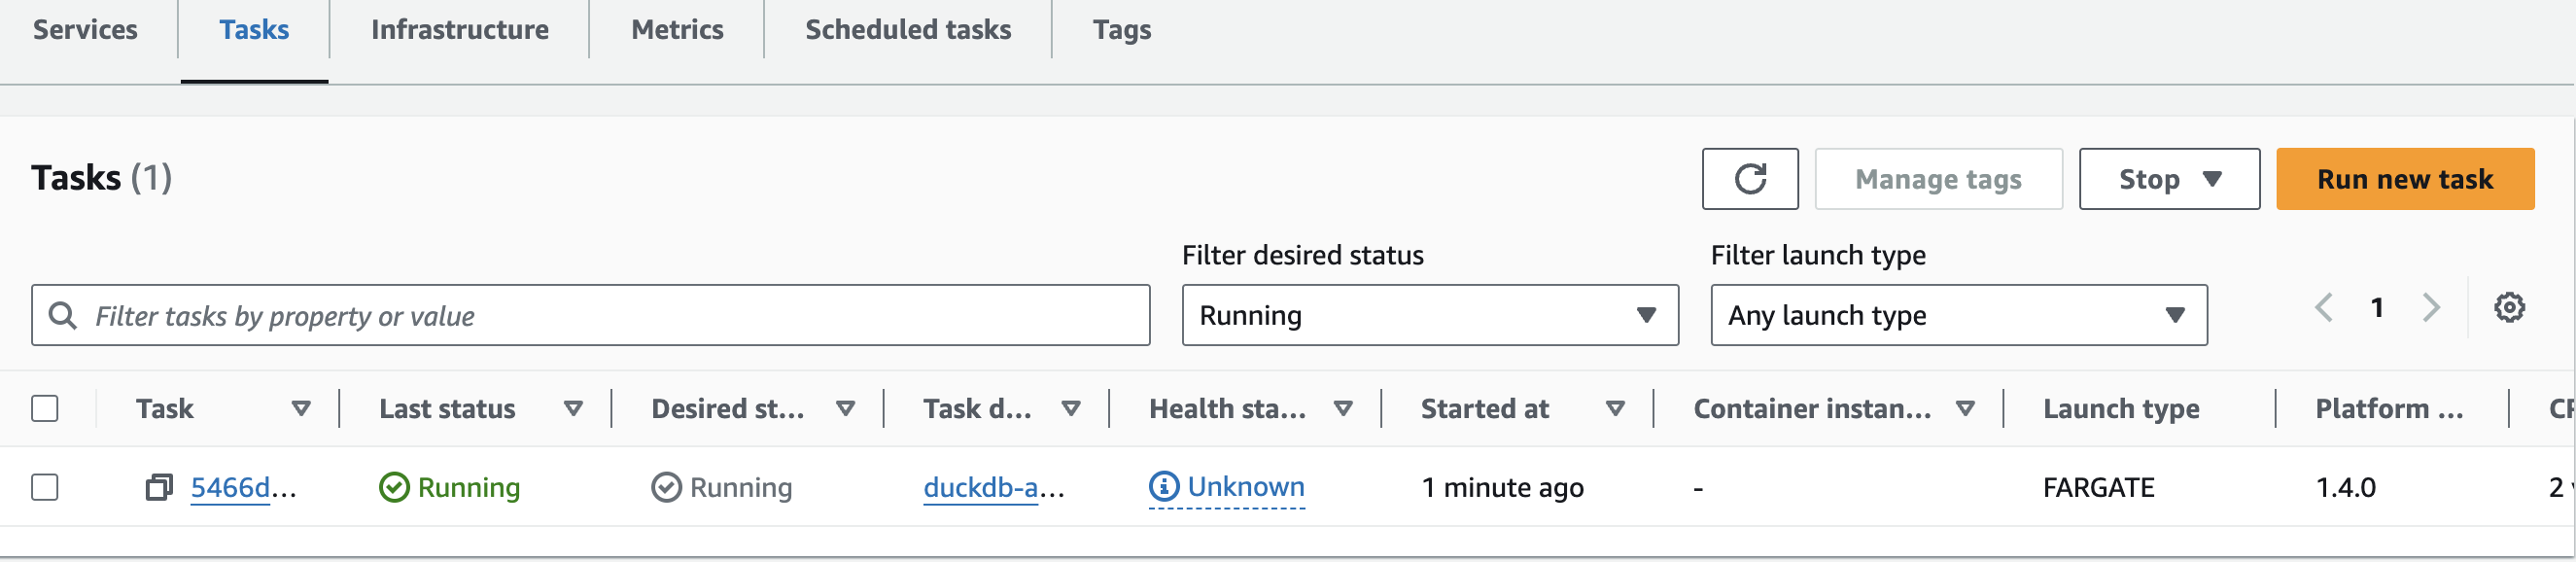
- Once done, click create and the deployment process will begin. You can see if or when the deployment is complete by going to your cluster and selecting Tasks. If the deployment is successful you should see this:
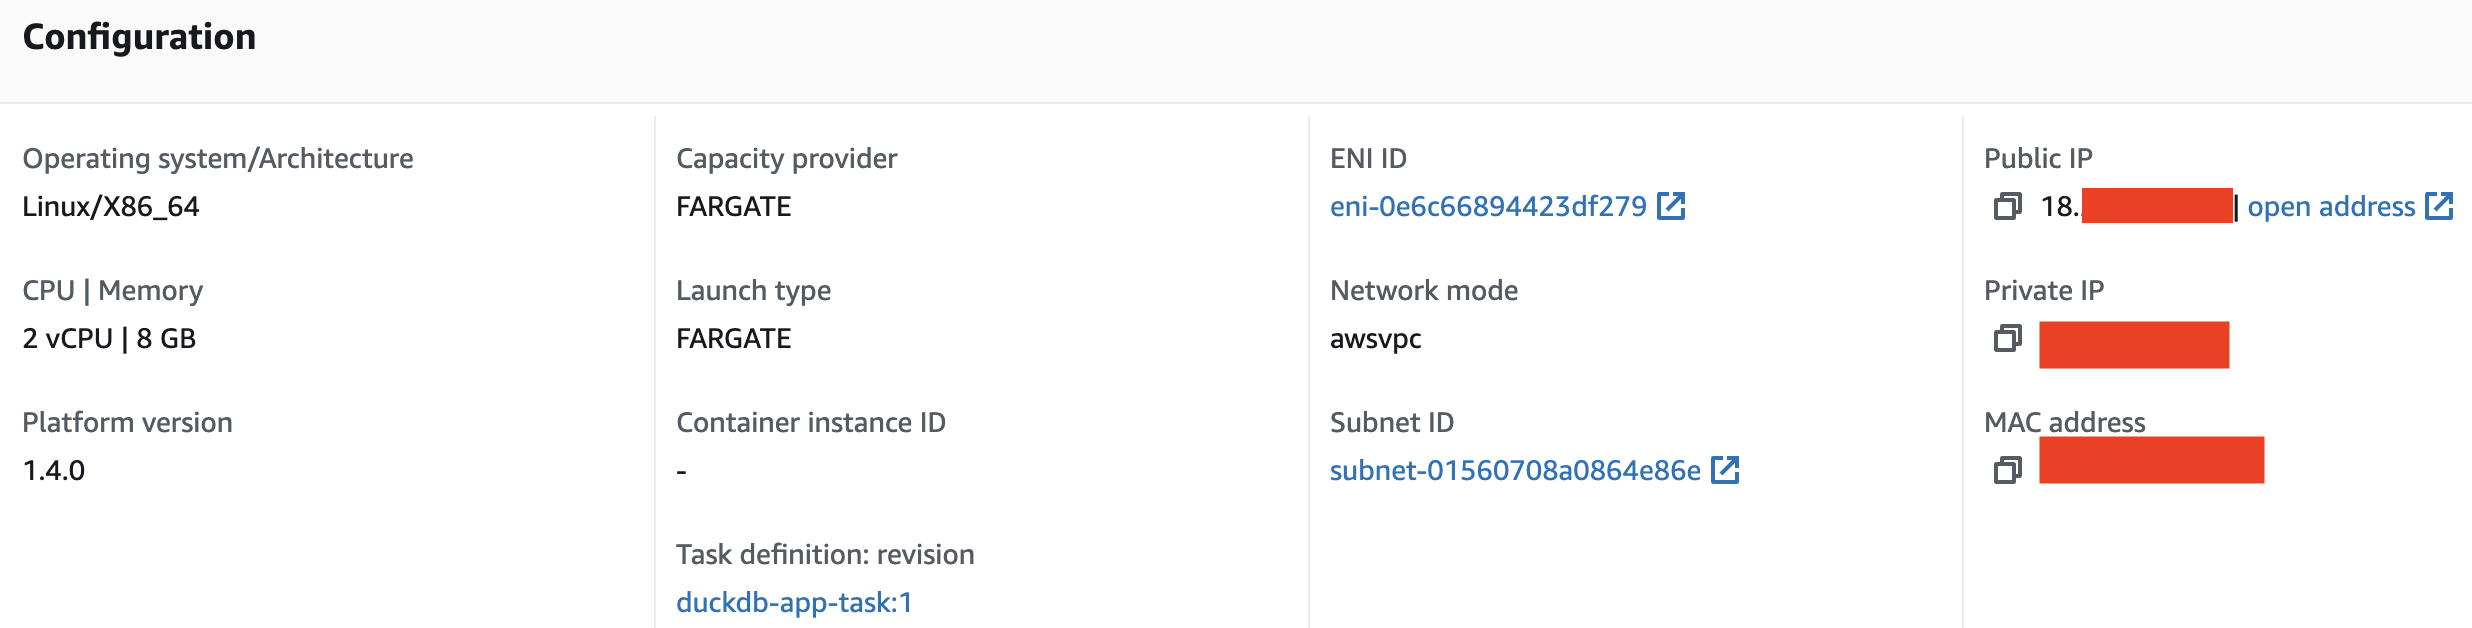
 Once the app is deployed, the url of the app can be found by clicking on the Task and copying the Public IP under Configuration:
Running Queries Against The Cloud VM
With the app url we can pass SQL queries to the query endpoint and DuckDB will query our Iceberg tables in S3:
import requests

# create the schema and views of iceberg tables in duckdb
warehouse_path = "s3://YOUR_BUCKET"
name_space = 'taxi'
database_path = f'{warehouse_path}/{name_space}.db'
url = '<ECS_TASK_IP>/query'

create_view_sql = f'''
CREATE SCHEMA IF NOT EXISTS taxi;

CREATE OR REPLACE VIEW taxi.trips AS
SELECT * FROM iceberg_scan('{database_path}/trips', allow_moved_paths = true);

CREATE OR REPLACE VIEW taxi.zones AS
SELECT * FROM iceberg_scan('{database_path}/zones', allow_moved_paths = true);
'''

query = {
    "query": create_view_sql
}
response = requests.post(url, params=query)

# Query Total Trips By Pickup and Drop-off Borough:
sql = f'''
select
    starting_zone.Borough as pickup_borough,
    ending_zone.Borough as dropoff_borough,
    count(*) as trip_count
from
taxi.trips as trips
left join taxi.zones as starting_zone
    on trips.PULocationID = starting_zone.LocationID
left join taxi.zones as ending_zone
    on trips.DOLocationID = ending_zone.LocationID
group by 1, 2
order by 1 asc, 3 desc
limit 20
'''

query = {
    "query": sql
}
response = requests.post(url, params=query)
response.json()
The last query above will return results in json format like so:
{'result': [['Bronx', 'Bronx', 38900],
  ['Bronx', 'Manhattan', 33779],
  ['Bronx', 'Queens', 7179],
  ['Bronx', 'Brooklyn', 6943],
  ['Bronx', 'N/A', 522],
  ['Bronx', 'Unknown', 231],
  ['Bronx', 'Staten Island', 163],
  ['Bronx', 'EWR', 35],
  ['Brooklyn', 'Brooklyn', 181514],
  ['Brooklyn', 'Manhattan', 130742],
  ['Brooklyn', 'Queens', 43224],
  ['Brooklyn', 'Bronx', 6967],
  ['Brooklyn', 'N/A', 1002],
  ['Brooklyn', 'EWR', 922],
  ['Brooklyn', 'Unknown', 896],
  ['Brooklyn', 'Staten Island', 643],
  ['EWR', 'EWR', 4710],
  ['EWR', 'Unknown', 237],
  ['EWR', 'N/A', 205],
  ['EWR', 'Manhattan', 129]]}
It’s important to note that the app isn’t specific to Iceberg. It can query any parquet or csv file in cloud storage using DuckDB. For example if we wanted to query a raw parquet file in a different bucket we could do it like this:
import requests

sql = f'''
select
    count(*)
from read_parquet('s3://<OTHER_BUCKET>/some_data.parquet');
'''

url = '<ECS_TASK_IP>/query'
query = {
    "query": sql
}
response = requests.post(url, params=query)
response.json()
Things to Note
As mentioned in our last post about deploying DuckDB and Iceberg to GCP, there are a few things to consider:
- At the time this post was written, DuckDB connected to S3 via the Iceberg extension was read-only; the extension has since added write support (INSERT, UPDATE, DELETE, MERGE INTO, ALTER TABLE), including writes to Iceberg tables backed by REST catalogs
- At the time this post was written, predicate pushdown for DuckDB and Iceberg was still in development;
iceberg_scannow supports filter/predicate pushdown and partition pruning - Persistence of
.duckdbfiles in the app and a more production-ready process for loading data was not covered in this post
For a more full discussion of these points check out this post.
All code for this post can be found here.